How to create a simple API using NodeJS and GraphQL

GraphQL is an open-source data query language and a runtime for backend services made by Facebook in 2012. In 2015, it was released to the public, and ever since its release, it has impressed a lot of developers with its unique abilities. While in REST APIs, developers need to write endpoints for each task (or interaction), GraphQL only needs to define one schema and it allows to request any type of data from the schema. This is a huge advantage in GraphQL which REST APIs don't have.
In graphQL, we can request data with queries and mutate those data with mutations. These are defined types in graphQL. Both of them are written in JSON-like language and once we developed the API we can test queries with a given interface called “GraphiQL”. For example, I have created a simple API (Which will be discussed later in this story) and, the following image shows GraphiQL interface for this API.
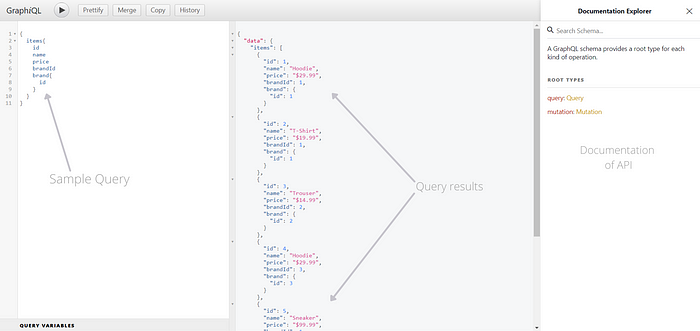
In the example, there are 3 sections shown. Sample query shows the text field where queries can be written. The query result shows the results of the sample query. “Documentation” provides detailed documentation of the API which is very helpful for developers.
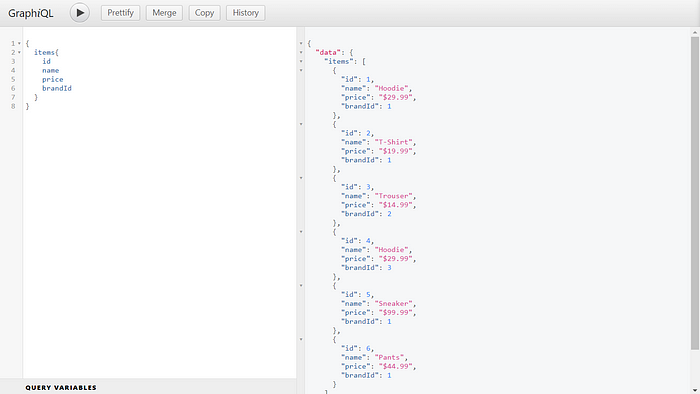
In the example, the query requested a list of objects which has a nested object in each object. If we do not want the nested object (Brand), we can change the query to the following query and get the results as we needed.
And if we needed the nested object with more fields, it would look like the following example.
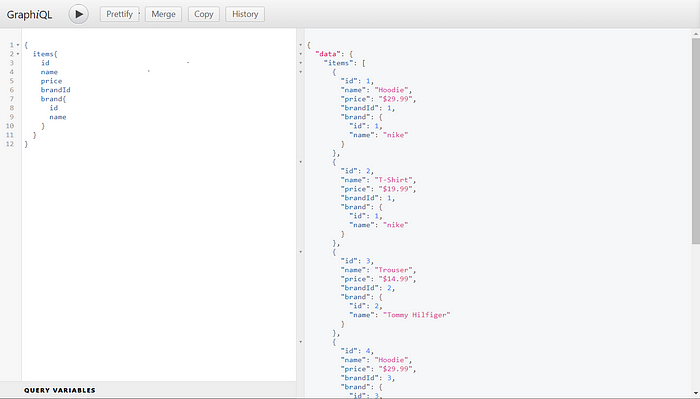
Like these examples, we can query anything using the same schema with graphQL. This is really helpful for rapid development projects and complex APIs so that developers can avoid creating multiple endpoints and focus on more complex tasks.
Let's find out how to develop the API shown in the examples.
GraphQL libraries and clients are available for a lot of backend languages and frameworks. You can discover language support for GraphQL, libraries, and clients available at this link.
Pre-requisites: NodeJS should be installed.
To initialize go to the root folder and open the terminal from there. Then enter,
npm initand continue entering necessary details. Once it is done, npm will create a “package.json” file. This file includes the details that have been provided after the first command and those can be changed anytime.
Then we can add the dependencies we need for this projects using the following command
npm i express express-graphql graphqlThis will add express js, express-graphql, and graphql modules to the project and produce a “package-lock.json” file. Now the project setup is finished.
You can use modules like “nodemon” for this project for your ease.
To start writing the code, we need to create a new file and I have named it “server.js”. (Note: in package.json, “main” is holding the name of the main file and its default value is “index.js”. You have to change its value)
{"name": "api-graphql","version": "1.0.0","description": "","main": "server.js","scripts": {"test": "echo \"Error: no test specified\" && exit 1"},"author": "","license": "ISC","dependencies": {"express": "^4.17.1","express-graphql": "^0.12.0","graphql": "^15.5.0"}}
The following is the example API shown before in this post.
Let's breakdown it and go through the code step by step
const express = require('express');const app = express();const { graphqlHTTP } = require("express-graphql");const { GraphQLSchema,GraphQLObjectType, GraphQLString,GraphQLList, GraphQLInt, GraphQLNonNull } = require("graphql");
These lines import all files for this project. Express and graphQLHTTP are used as middleware in this API and other GraphQL imports are used to define types later in the code. Then to store data, the following arrays were used instead of using a database. In this scenario, these arrays contain some products and their manufacturers.
const items = [{id: 1,name: "Hoodie",price: "$29.99",brandId: 1},{id: 2,name: "T-Shirt",price: "$19.99",brandId: 1},{id: 3,name: "Trouser",price: "$14.99",brandId: 2},{id: 4,name: "Hoodie",price: "$29.99",brandId: 3},{id: 5,name: "Sneaker",price: "$99.99",brandId: 1},{id: 6,name: "Pants",price: "$44.99",brandId: 1}];const brands = [{id : 1,name: "nike",},{id: 2,name: "Tommy Hilfiger"},{id: 3,name: "Levis"}];
Now we need to define the types for use in the schema. According to the arrays, we need to define two types for Items and Brands
Brand type: Brand objects have two values named id and name. We can define a type for brand objects as the following snippet.
const BrandType = new GraphQLObjectType({
  name: "Brand",
  description: "This is a brand",
  fields: () => ({
    id: {
      type: GraphQLNonNull(GraphQLInt)
      //GraphQLInt is a defined data type in graphQL
      //when using GraphQLNonNull, this field does not accept null
    },
    name: {
      type: GraphQLNonNull(GraphQLString)
      //GraphQLString is a defined data type in graphQL
    }
  })
})
Item Type: Item objects have four values named id, name, price, and brandId and it must be able to query brands with brand id. To do that resolve is used. Resolvers are functions provided to a type to execute instructions for given arguments or parameters. To link brand objects to items we can use Array.find() method and return the brand after comparing their id with item’s brandId.
const ItemType = new GraphQLObjectType({
  name : "Item",
  description: "This is an item",
  fields: () => ({
    id: {
      type: GraphQLNonNull(GraphQLInt),
    },
    name: {
      type: GraphQLNonNull(GraphQLString)
    },
    price: {
      type: GraphQLNonNull(GraphQLString)
    },
    brandId : {
      type: GraphQLNonNull(GraphQLInt)
    },
    brand: {
      type: GraphQLNonNull(BrandType),
      resolve: (item) => {
        return brands.find(brand => brand.id === item.brandId)
      }
    }
  })
})
Now we have the necessary building blocks to define our basic query type and mutation type. These types are basically used as grapghQL objects in the schema so that we need to make these using GraphQLObjectType. To query the list and single objects in both arrays, we need 4 queries to define. To get a single object we need to use a unique value, and “items.id” and “brands.id ” can be used for that. To find the exact object, we need to use resolvers again. In this case, the query uses arguments(args) to take the id to the query and these args need to be defined in the query. Both item and brand queries accept id as args and in the resolve method, it returns the exact object which contains a matching id to the args.
const RootQueryType = new GraphQLObjectType({
  name: "Query",
  description: "Root Query",
  fields: () => ({
    item: {
      type: ItemType,
      description: "An item",
      args: {
        id: {
          type: GraphQLInt
        }
      },
      resolve: (parent,args) => {
        return items.find(item => item.id === args.id)
      }
    },
    items: {
      type: GraphQLList(ItemType),
      description: "List of items",
      resolve: () => items
    },
    brand: {
      type: BrandType,
      description: "A brand",
      args: {
        id: {
          type: GraphQLInt
        }
      },
      resolve: (parent,args) => {
        return brands.find(brand => brand.id === args.id)
      }
    },
    brands: {
     type: GraphQLList(BrandType),
      description: "List of Brands",
      resolve: () => brands
    }
  })
});
Now we can execute queries to view data, but not complete yet. To complete the API, we need to create Mutations to add, update, and delete objects in the arrays. We can create mutations for both arrays as the following snippet.
const RootMutationType = new GraphQLObjectType({
  name: "Mutation",
  description: "Root mutation",
  fields: () => ({
    addItem: {
    type: ItemType,
    description: "Add an item",
    args: {
      name: {
        type: GraphQLNonNull(GraphQLString)
      },
      price: {
        type: GraphQLNonNull(GraphQLString)
      },
      brandId: {
        type: GraphQLNonNull(GraphQLInt)
      }
    },
    resolve: (parent,args) => {
      var temp = {
        id: items.length+1,
        name: args.name,
        price: args.price,
        brandId: args.brandId
      };
      items.push(temp);
      return temp;
    }
  },
  addBrand: {
    type: BrandType,
    description: "Add a brand",
    args: {
      name: {
        type: GraphQLNonNull(GraphQLString)
      }
    },
    resolve: (parent,args) => {
      var temp = {
        id: brands.length+1,
        name: args.name,
      };
      brands.push(temp);
      return temp;
    }
  },
  deleteItem: {
    type: GraphQLList(ItemType),
    description: "Delete an item",
    args: {
      id: {
        type: GraphQLNonNull(GraphQLInt)
      }
    },
    resolve: (parent, args) => {
      items.splice(items.findIndex(item => item.id === args.id),1);
      return items;
    }
  },
  deleteBrand: {
    type: GraphQLList(BrandType),
    description: "Delete a brand",
    args: {
      id: {
        type: GraphQLNonNull(GraphQLInt)
      }
    },
    resolve: (parent, args) => {
      brands.splice(brands.findIndex(brand => brand.id === args.id),1);
      return brands;
    }
  },
  updateItem: {
    type: ItemType,
    description: "Update an item",
    args: {
      id: {
        type: GraphQLNonNull(GraphQLInt)
      },
      name: {
        type: GraphQLNonNull(GraphQLString)
      },
      price: {
        type: GraphQLNonNull(GraphQLString)
      },
      brandId: {
        type: GraphQLNonNull(GraphQLInt)
      }
    },
    resolve:(parent, args) =>  {
      var temp = items.findIndex(item => item.id === args.id);
        items[temp] = {
          id: args.id,
          name: args.name,
          price: args.price,
          brandId: args.brandId
        }
      return items[temp];
    }
  },
  updateBrand: {
    type: BrandType,
    description: "Update a brand",
    args: {
      id: {
        type: GraphQLNonNull(GraphQLInt)
      },
      name: {
        type: GraphQLNonNull(GraphQLString)
      }
    },
    resolve: (parent, args) => {
      var temp = brands.findIndex(brand => brand.id === args.id);
        brands[temp] = {
          id: args.id,
          name: args.name
        };
        return brands[temp];
      }
    }
  })
});
Now we have created all the necessary parts of the schema. Now we only have to assemble these objects in the schema and deploy this on the server. In the schema, we have to assign rootQueryType and rootMutationType objects.
And then we have to enable graphiQL in the server to access the GraphiQL interface. And to access that, we will be using the “/graphql” URL.
const schema = new GraphQLSchema({
  mutation: RootMutationType,
  query: RootQueryType
}); app.use("/graphql", graphqlHTTP({
  schema: schema,
  graphiql: true
}));app.listen(5000,() => console.log("Server running on port: 5000"));
Now our work is complete. Let's see the results of the API in the GraphiQL interface. Since we deployed this in localhost:5000 and assign the endpoint as “/graphql”, we can access GraphiQL from http://localhost:5000/graphql.
Query Results
Items queries


Brand Queries


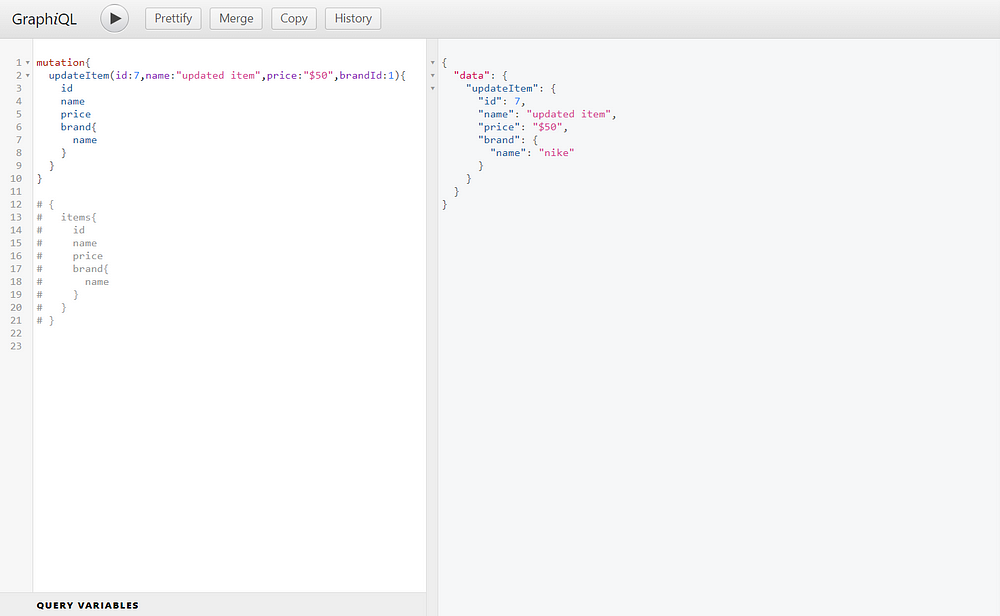
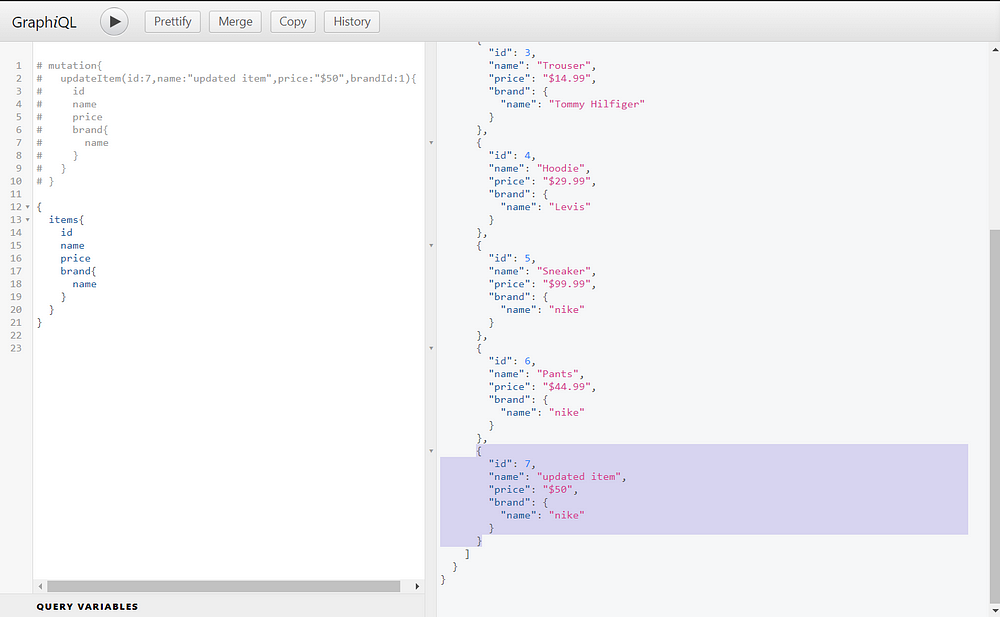
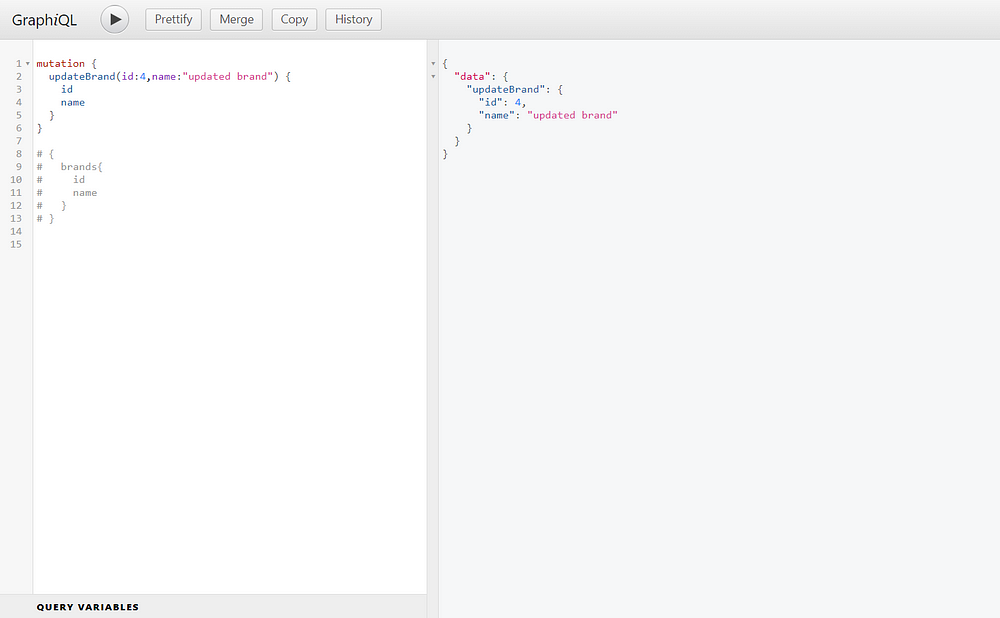
Mutation Results
Items mutations



Brand mutations




And that wraps up this post. If you have any comments, suggestions,s or criticism about this post, please mention them in the comments. Thank you very much :) and stay safe ❤